In Scrolling Table – Part 2 we looked at a technique for getting a scrolling table with a static header row by using a custom control to link the column widths of two tables, but there was no support for cells which span multiple columns. In this final part we’ll add column spanning.
We need to modify the onLayout() method of our ScrollingTable class. In the first loop, which determines the column width from the body table, we’ll simply ignore the width when there is a span of anything but 1. If we apply a column span to the same cell in every row, TableLayout will get confused, and the column widths calculation will get messed up. But this would be the case in a standard TableLayout not just this solution. So it iit is safe assumption that each column will have an explicit width set in at least one of the rows. In the second loop, which applies the previously determined width to the header table, will sum the column widths if the header contains a cell which spans multiple columns:
@Override
protected void onLayout( boolean changed, int l, int t, int r, int b )
{
	super.onLayout( changed, l, t, r, b );
	List<Integer> colWidths = new LinkedList<Integer>();

	TableLayout header = (TableLayout) findViewById( R.id.HeaderTable );
	TableLayout body = (TableLayout) findViewById( R.id.BodyTable );

	for ( int rownum = 0; rownum < body.getChildCount(); rownum++ )
	{
		TableRow row = (TableRow) body.getChildAt( rownum );
		for ( int cellnum = 0; cellnum < row.getChildCount(); cellnum++ )
		{
			View cell = row.getChildAt( cellnum );
			TableRow.LayoutParams params = (TableRow.LayoutParams)cell.getLayoutParams();
			Integer cellWidth = params.span == 1 ? cell.getWidth() : 0;
			if ( colWidths.size() <= cellnum )
			{
				colWidths.add( cellWidth );
			}
			else
			{
				Integer current = colWidths.get( cellnum );
				if( cellWidth > current )
				{
					colWidths.remove( cellnum );
					colWidths.add( cellnum, cellWidth );
				}
			}
		}
	}

	for ( int rownum = 0; rownum < header.getChildCount(); rownum++ )
	{
		TableRow row = (TableRow) header.getChildAt( rownum );
		for ( int cellnum = 0; cellnum < row.getChildCount(); cellnum++ )
		{
			View cell = row.getChildAt( cellnum );
			TableRow.LayoutParams params = (TableRow.LayoutParams)cell.getLayoutParams();
			params.width = 0;
			for( int span = 0; span < params.span; span++ )
			{
				params.width += colWidths.get( cellnum + span );
			}
		}
	}
}
This will now handle spans because of the changes to lines 42-45. If you need to use a span in the header table, then you will need to add one dummy line of 0dp high items below it otherwise TableLayout will get confused and not layout the columns correctly. This is because of how TableLayout calculates the column widths, and nothing to do with how we are linking the column widths of the two tables together.
We can change out layout to show this working:
<com.stylingandroid.ScrollingTable.ScrollingTable
	android:layout_width="match_parent"
	android:orientation="vertical" android:layout_weight="1"
	android:layout_height="match_parent">
	<TableLayout android:layout_height="wrap_content"
		android:layout_width="match_parent"
		android:id="@+id/HeaderTable">
		<TableRow style="@style/HeaderRow">
			<TextView style="@style/HeaderText"
				android:text="Col 1" />
			<TextView style="@style/HeaderText" android:layout_weight="1"
				android:text="Col 2" />
			<TextView style="@style/HeaderText"
				android:text="Col 3"
				android:layout_span="2" />
			<!--TextView style="@style/HeaderText"
				android:text="Col 4" /-->
		</TableRow>
		<TableRow style="@style/BodyRow">
			<TextView android:text="Dummy"
				style="@style/BodyText" android:height="0dp" />
			<TextView android:text="Dummy"
				style="@style/BodyText"
				android:layout_weight="1"
				android:height="0dp" />
			<TextView android:text="Dummy"
				style="@style/BodyText"
				android:height="0dp" />
			<TextView android:text="Dummy"
				style="@style/BodyText"
				android:height="0dp " />
		</TableRow>
	</TableLayout>
	<ScrollView android:layout_width="match_parent"
		android:layout_height="wrap_content">
		<TableLayout android:layout_height="wrap_content"
			android:layout_width="match_parent"
			android:id="@+id/BodyTable">
			<TableRow style="@style/BodyRow">
				<TextView android:text="Cell 1,1"
					style="@style/BodyText" />
				<TextView android:text="Cell 1,2"
					style="@style/BodyText"
					android:layout_weight="1"/>
				<TextView android:text="Cell 1,3"
					style="@style/BodyText"/>
				<TextView android:text="Cell 1,4"
					style="@style/BodyText" />
			</TableRow>
			<TableRow style="@style/BodyRow">
				<TextView android:text="Cell 2,1"
					style="@style/BodyText" />
				<TextView android:text="Cell 2,2"
					style="@style/BodyText"
					android:layout_weight="1" />
				<TextView android:text="Cell 2,3"
					style="@style/BodyText"
					android:layout_span="2"/>
				<!--TextView android:text="Cell 2,4"
					style="@style/BodyText" /-->
			</TableRow>
			.
			.
			.
			<TableRow style="@style/BodyRow">
				<TextView android:text="Cell 8,1"
					style="@style/BodyText" />
				<TextView android:text="Cell 8,2"
					style="@style/BodyText"
					android:layout_weight="1" />
				<TextView android:text="Cell 8,3"
					style="@style/BodyText" />
				<TextView android:text="Cell 8,4"
					style="@style/BodyText" />
			</TableRow>
		</TableLayout>
	</ScrollView>
</com.stylingandroid.ScrollingTable.ScrollingTable>
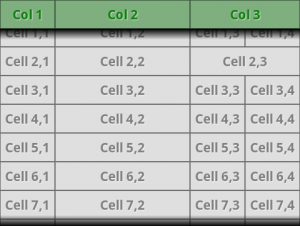
If we now run this, we can see the correct span behaviour:
So there we have it – a Scrolling Table where the body cells can scroll independently from the header, while the columns all line up. While this has certainly solved the problem that we set out to solve it is only really useful in cases where we have a relatively small number of rows. Without our core requirement to have a header row, then it should be clear that if the number of rows grows above a relatively small number, then a ListView would be much more efficient. The same logic applies here. Possibly a future article will cover how to achieve the same result using a ListView instead of a TableLayout.
It is worth mentioning that, for the sake of clarity, I have omitted much of the error checking needed to use this code in a production context. I would strongly suggest adding some robustness to this before using it in a real project.
The final source code or this article can be found here.
© 2011, Mark Allison. All rights reserved. This article originally appeared on Styling Android.
Portions of this page are modifications based on work created and shared by Google and used according to terms described in the Creative Commons 3.0 Attribution License

