In Scrolling Table – Part 1 we looked at a technique for getting a scrolling table with a static header row by using two tables and hiding content in each. In this part we’ll look at a more efficient approach to the same problem.
To start either continue with the project from Part 1, or you can obtain it here.
An alternative approach to using duplicate tables, is to create a custom control which will do the magic for us. Let’s create a new class called ScrollingTable which extends LinearLayout:
package com.stylingandroid.ScrollingTable;

import android.content.Context;
import android.util.AttributeSet;
import android.widget.LinearLayout;

public class ScrollingTable extends LinearLayout
{
	public ScrollingTable( Context context )
	{
		super( context );
	}

	public ScrollingTable( Context context, AttributeSet attrs )
	{
		super( context, attrs );
	}
}
We can now wrap our two tables inside this control. Note how we no longer duplicate the data, the first table contains only the header, and the body contains only the body data:
	<com.stylingandroid.ScrollingTable.ScrollingTable
		android:layout_width="match_parent"
		android:orientation="vertical"
		android:layout_weight="1"
		android:layout_height="match_parent">
		<TableLayout android:layout_height="wrap_content"
			android:layout_width="match_parent"
			android:id="@+id/HeaderTable">
			<TableRow style="@style/HeaderRow">
				<TextView style="@style/HeaderText"
					android:text="Col 1" />
				<TextView style="@style/HeaderText"
					android:layout_weight="1"
					android:text="Col 2" />
				<TextView style="@style/HeaderText"
					android:text="Col 3" />
				<TextView style="@style/HeaderText"
					android:text="Col 4" />
			</TableRow>
		</TableLayout>
		<ScrollView android:layout_width="match_parent"
			android:layout_height="wrap_content">
			<TableLayout android:layout_height="wrap_content"
				android:layout_width="match_parent"
				android:id="@+id/BodyTable">
				<TableRow style="@style/BodyRow">
					<TextView android:text="Cell 1,1"
						style="@style/BodyText" />
					<TextView android:text="Cell 1,2"
						style="@style/BodyText"
						android:layout_weight="1"/>
					<TextView android:text="Cell 1,3"
						style="@style/BodyText" />
					<TextView android:text="Cell 1,4"
						style="@style/BodyText" />
				</TableRow>
				.
				.
				.
				<TableRow style="@style/BodyRow">
					<TextView android:text="Cell 8,1"
						style="@style/BodyText" />
					<TextView android:text="Cell 8,2"
						style="@style/BodyText"
						android:layout_weight="1" />
					<TextView android:text="Cell 8,3"
						style="@style/BodyText" />
					<TextView android:text="Cell 8,4"
						style="@style/BodyText" />
				</TableRow>
			</TableLayout>
		</ScrollView>
	</com.stylingandroid.ScrollingTable.ScrollingTable>
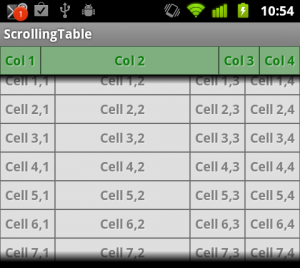
If we run this, it will produce the same as before when we did this at the beginning of part 1: We get the scrolling behaviour that we require, but the columns do not line up correctly:
Now comes the custom logic. We override the onLayout() method of ScrollingTable:
@Override
protected void onLayout( boolean changed, int l, int t, int r, int b )
{
	super.onLayout( changed, l, t, r, b );
	List<Integer> colWidths = new LinkedList<Integer>();

	TableLayout header = (TableLayout) findViewById( R.id.HeaderTable );
	TableLayout body = (TableLayout) findViewById( R.id.BodyTable );

	for ( int rownum = 0; rownum < body.getChildCount(); rownum++ )
	{
		TableRow row = (TableRow) body.getChildAt( rownum );
		for ( int cellnum = 0; cellnum < row.getChildCount(); cellnum++ )
		{
			View cell = row.getChildAt( cellnum );
			Integer cellWidth = cell.getWidth();
			if ( colWidths.size() <= cellnum )
			{
				colWidths.add( cellWidth );
			}
			else
			{
				Integer current = colWidths.get( cellnum );
				if( cellWidth > current )
				{
					colWidths.remove( cellnum );
					colWidths.add( cellnum, cellWidth );
				}
			}
		}
	}

	for ( int rownum = 0; rownum < header.getChildCount(); rownum++ )
	{
		TableRow row = (TableRow) header.getChildAt( rownum );
		for ( int cellnum = 0; cellnum < row.getChildCount(); cellnum++ )
		{
			View cell = row.getChildAt( cellnum );
			TableRow.LayoutParams params = (TableRow.LayoutParams)cell.getLayoutParams();
			params.width = colWidths.get( cellnum );
		}
	}
}
This code is relatively straightforward. The code expects there to be two child TableLayout elements with the IDs R.id.HeaderTable and R.id.BodyTable. The first for loop looks at each cell in each row and builds a list containing the width of each column. Then the second for loop sets the width of each cell in the header to match those of the we obtained previously.
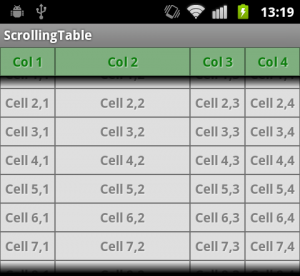
If we run this, we’ll see exactly the same behaviour as the previous solution, but without the duplication:
This is a much more elegant solution than before, and the data can be dynamic (and you can add rows programmatically) because the structure is inspected each time a layout is performed on the control. There is, however a potential problem with this: If one of the header cells is longer than all of the body cells in that column, then this will not be correctly factored in. There is an obvious solution to this, we simply duplicate the header line in the body table, with 0dp height as we did in Part 1. Although this means that there is some duplication, it is only a single row, and not a duplication of the entire table as was previously the case. Alternatively, we could add some additional logic in our onLayout method to handle this.
While this seems to be working, there is one use-case which isn’t covered: When we use android:layout_span to force a cell to span multiple columns. In the final part of this article, we’ll add support for column spans in to our solution.
The source code for this article can be found here.
© 2011, Mark Allison. All rights reserved. This article originally appeared on Styling Android.
Portions of this page are modifications based on work created and shared by Google and used according to terms described in the Creative Commons 3.0 Attribution License


